One of my co-workers introduced me to the idea of lightboards a couple of weeks ago. I had seen them before while watching YouTube tutorials and that kind of thing, but I never realized that they were “open source hardware” and how easy it seemed to be to create one. That said, they still seemed a bit price prohibitive to me, as the builds shown required a monster piece of glass, along with some pretty fancy cameras. Most of the examples are universities that have built them for various purposes. Clemson has a whole lightboard room you can reserve!
However, the same co-worker also linked me to this video, where the lady builds a mini version of the standup lightboard on the cheap. It seems to work pretty well in the video, but I still wasn’t super thrilled about the fact that it required recording and flipping the video after drawing. That problem seemed easily solvable, but I also didn’t really like the real estate that the standup board took up. Cut to me trying to figure out how I can create a flat, desktop version of this that can be used during live video calls. I was able to come up with something workable for about 160 bucks, about 110 if you’ve already got a USB webcam.
Parts List
I needed to buy quite a bit of cheap stuff for this project; however, I had some things at home that would have been super expensive to purchase outright. This is mostly power tools and accessories: a miter saw, electric drill, Kreg jig.
Here’s a basic parts list with links to what I bought.
For the lightboard:
- 1 1 x 4 Board (8 ft.) - $8.52
- 4 3/8in x 36in Square Dowels - 4 x $1.14
- 1 Box 1in Nails - $2.64
- 1 24in x 18in Plexiglass Sheet (The thickest one they had) - $21.98
- 1 16ft LED Light Strip - $13.99
- 1 Expo Neon Markers - $7.21
Total: $58.90
For the camera:
- 1 Webcam Stand - $18.78
- 1 Logitech C920 Webcam - $49.99
- 1 Manycam Lifetime License - $29.00
- 1 Webcam Settings App - $2.99
Total: $100.76
Grand Total: $159.66
It’s easy to see how you could really save some coin on this if you’ve already got a webcam that fits the stand, which is just a screw-in on the bottom.
Building The Box
Building the box is pretty much just that. Building a box. This step uses up the 1x4 that we bought. Just make sure to follow the “measure twice cut once” mantra. I ended up having to purchase more wood because I wasn’t paying attention. :facepalm:
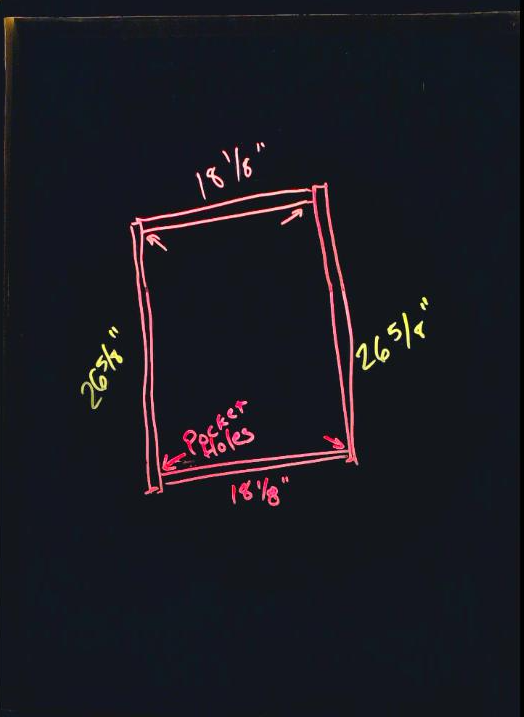
Here’s a diagram of what the base box looked like for me. Notice I had to add 1/8” to the inner dimensions of the box. This is because the plexigrass was actually a bit larger than advertised.
I had a “Kreg jig” that allowed me to drill pocket holes from the shorter pieces of wood into the longer pieces.Here’s a video that shows how that works. The jig isn’t cheap though, so don’t feel like you need to buy it just for this project. If you do other woodworking stuff it’s awesome. I also had some 1 & 1/4” screws that came with the jig that I used for this. I didn’t include them in the cost above, but you can use any screws around that length to join the wood by just screwing straight through and it should be fine.
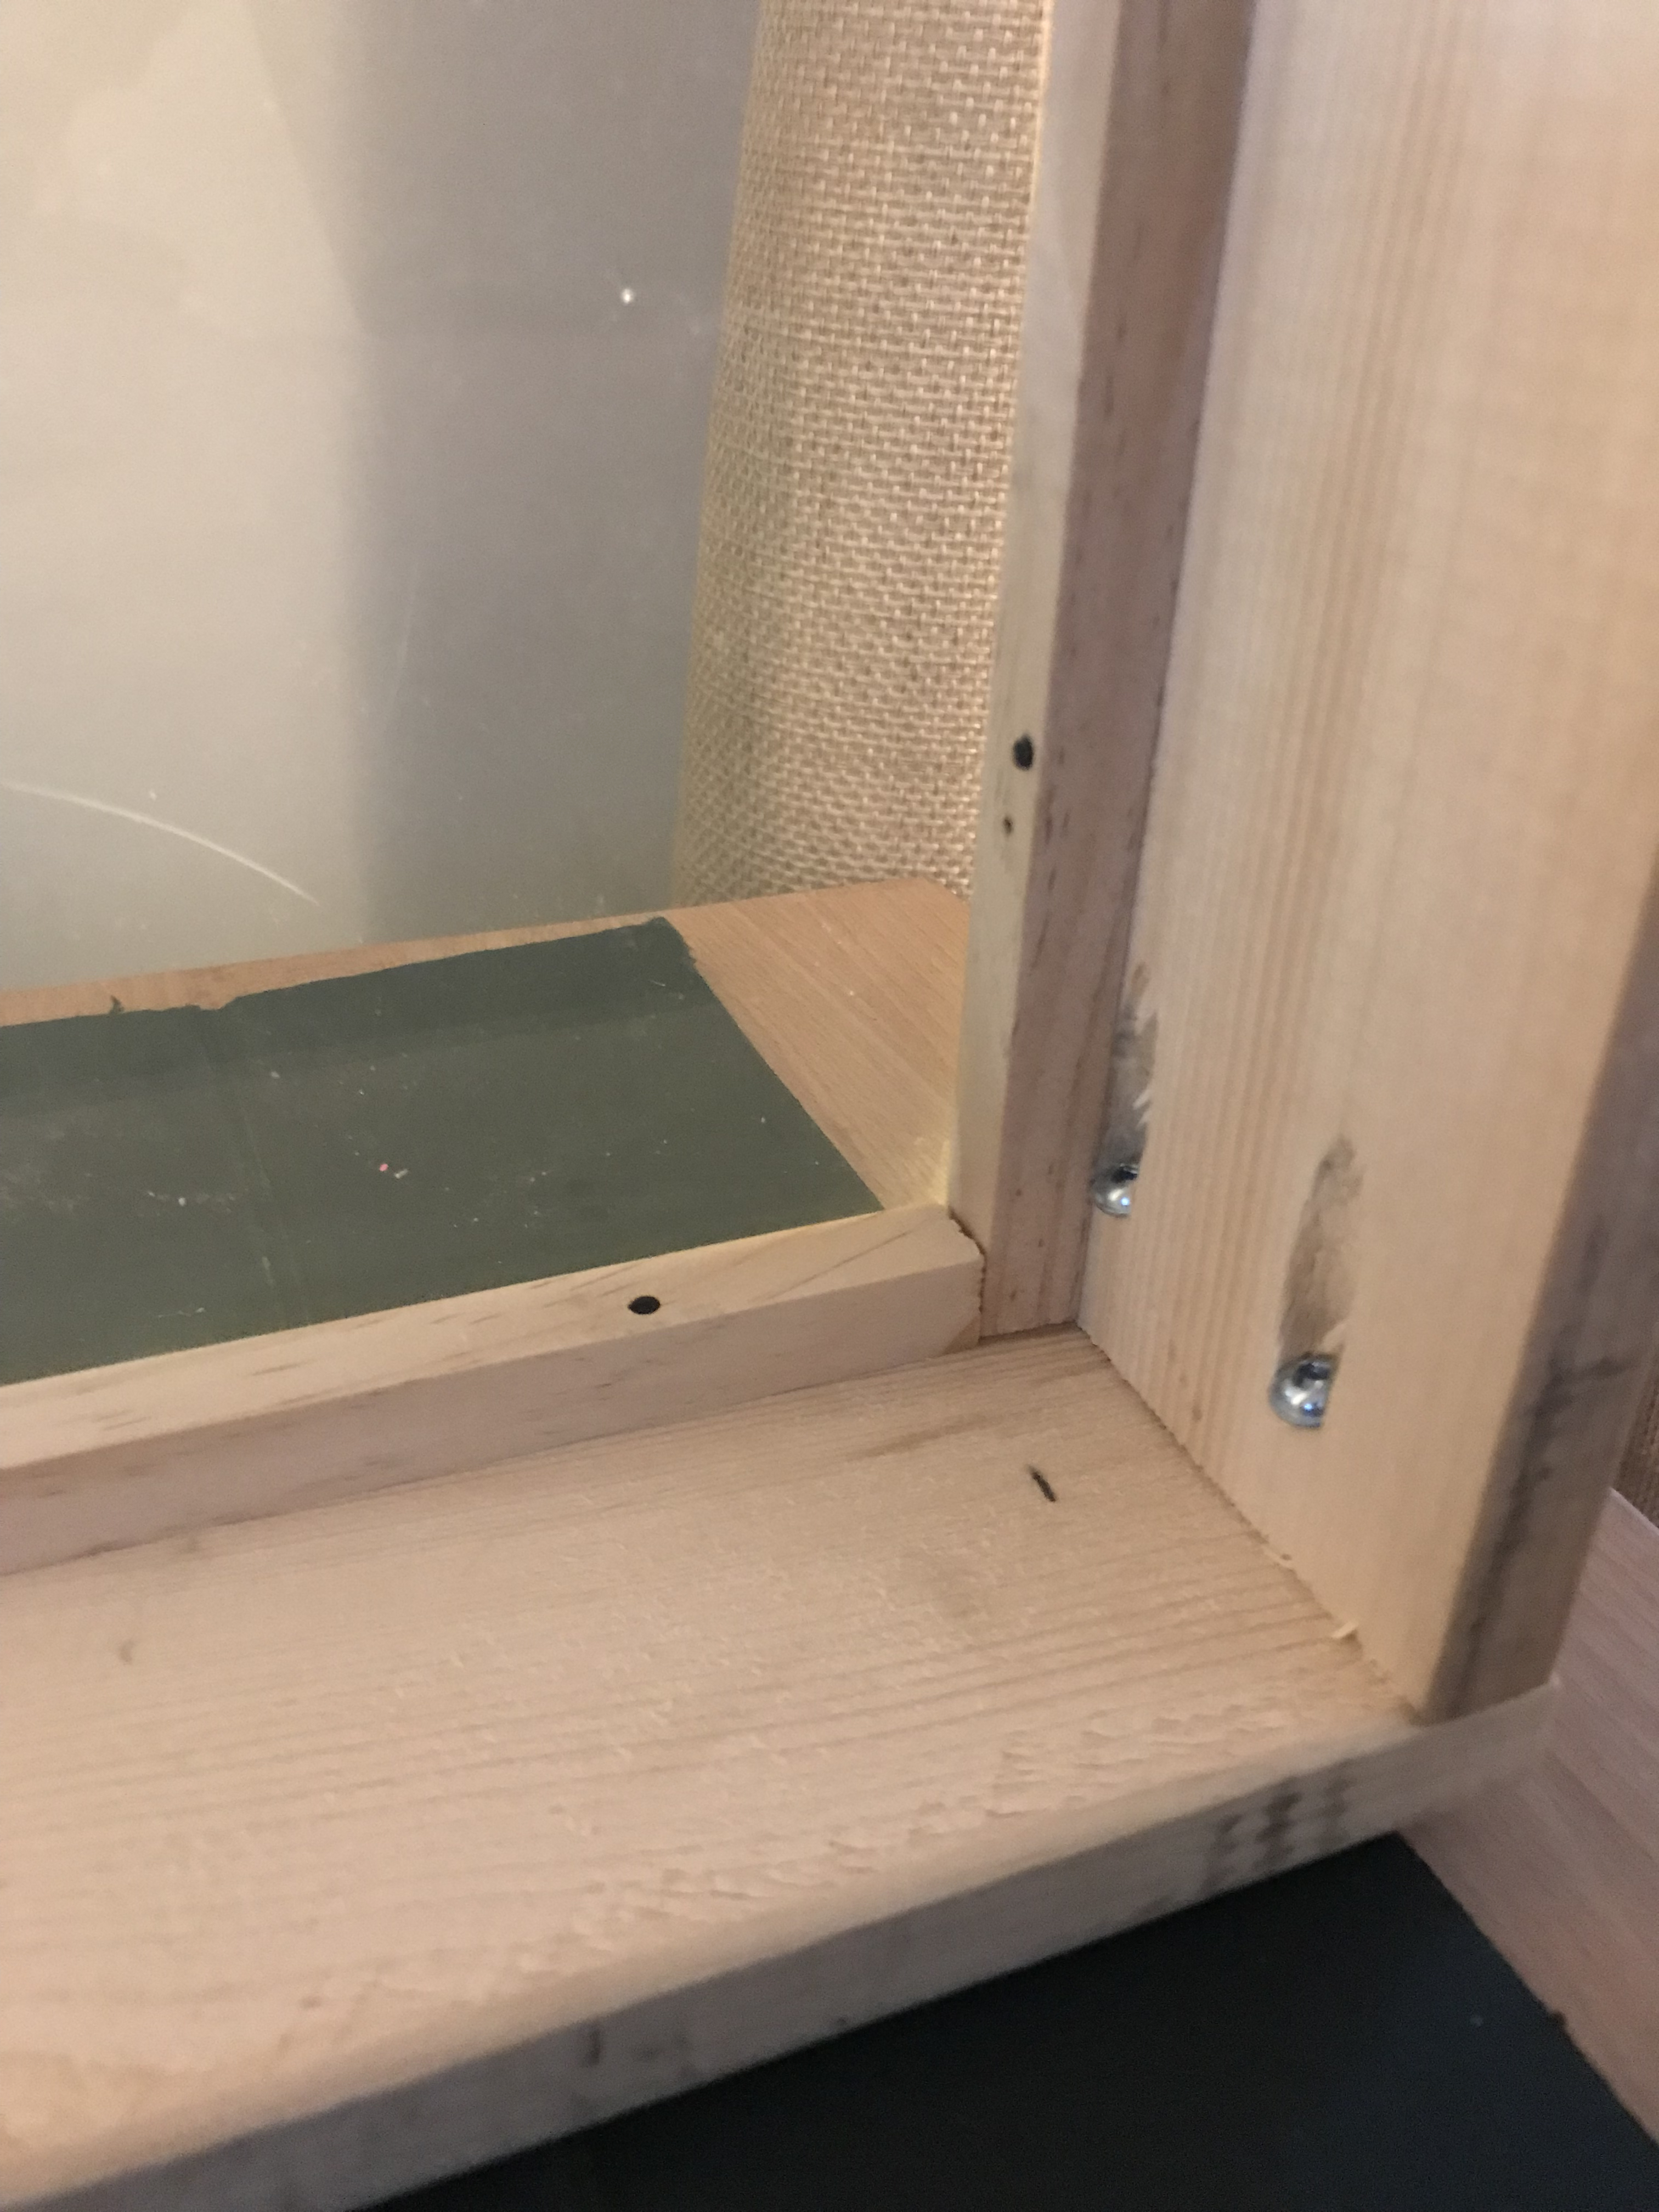
Once I had the base box built, it was time to create a little shelf for the plexiglass and the LED lights. This is where we’ll use the square dowels we bought. I started by cutting two of them down to 18-1/8” to match the shorter sides of the box. using the 1” nails, I then nailed these in about 1/2” down from what will be the top side of the lightboard.I wish I had taken more pics of this during the build, but here’s the bottom of the finished product where you see how these dowels can be nailed in and butted up against one another on all side.
NOTE: On one of the sides, it’s a good idea to cut one of the dowels a bit short. This will allow you to feed the LEDs up into the shelf cavity in the next step. Pic of that here:
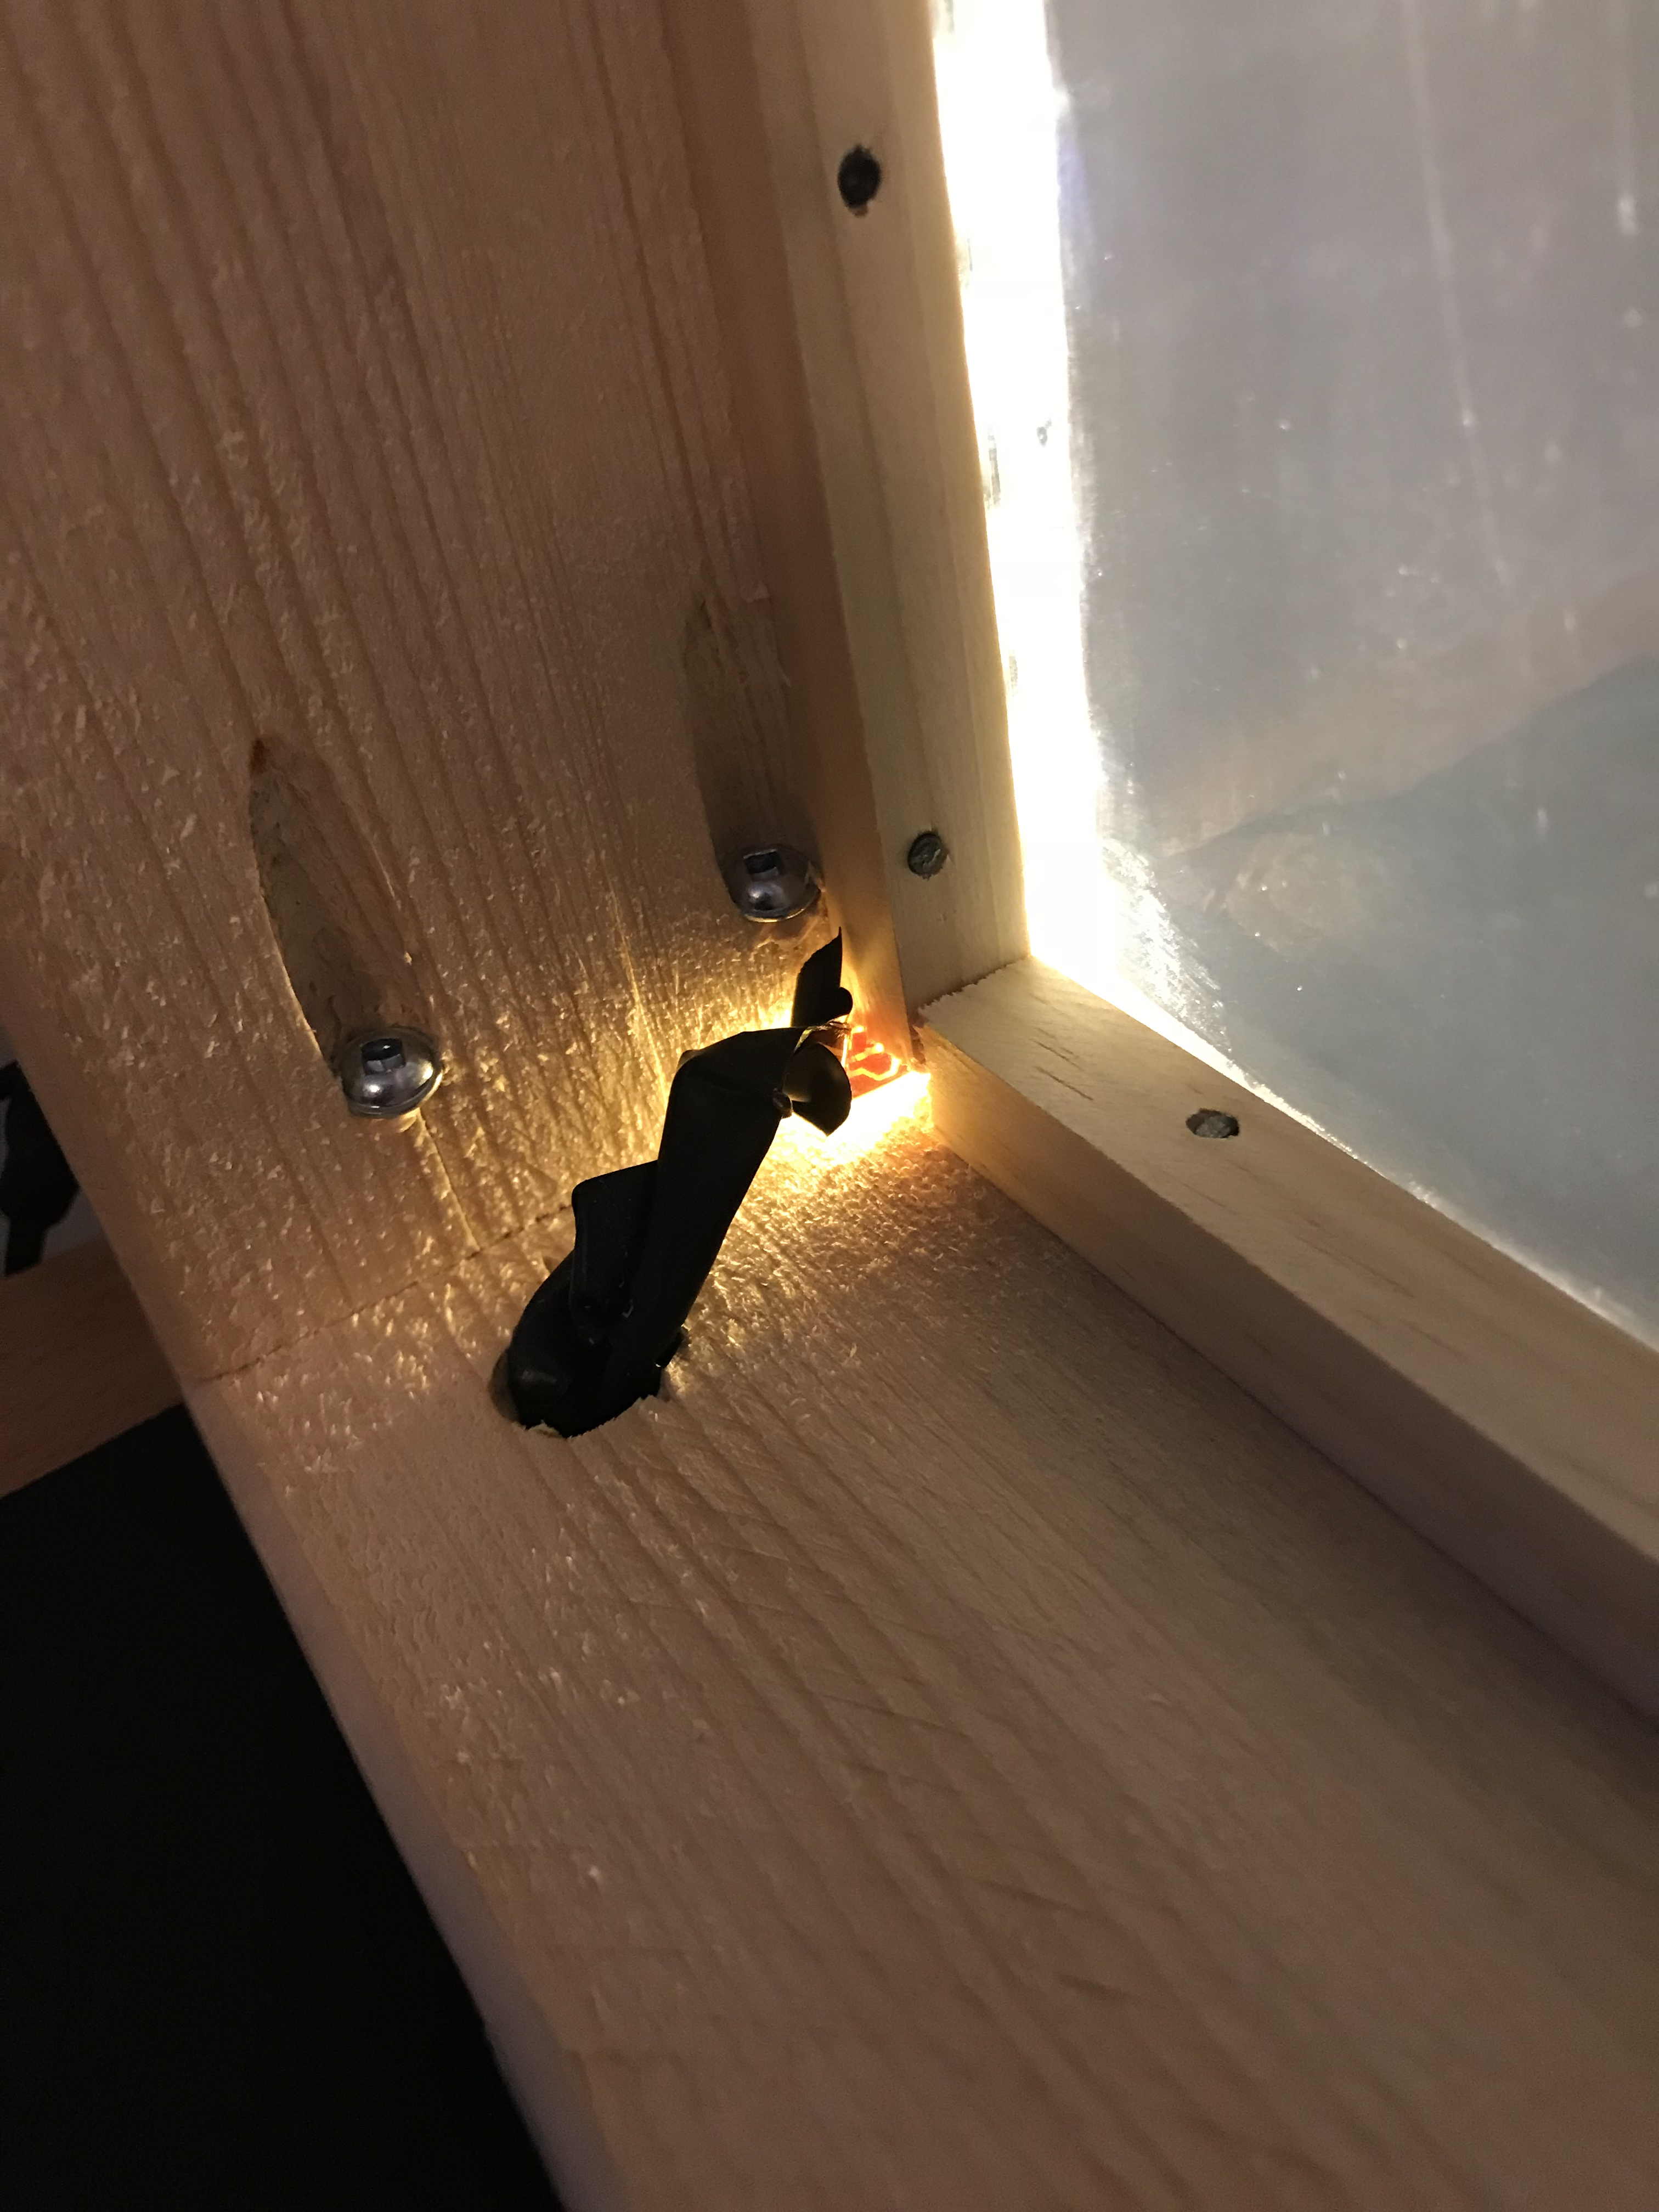
You may also notice above that the cord for the LED strip is going out the side of the box. I drilled a large hole in the side to allow the plug through so the box could sit flat.
With the shelf built, you can now mount the LED strip on the inside of one of the short sides. The LED strip I bought was made to be cut to length and had sticky tape on the back. It was pretty easy to just peel off and stick to the inside. Seemed secure enough! With that in place, you can now slide the plexiglass into the box as well. Like I mentioned in the parts list, buy the thickest plexiglass they have at that size, since the thin one will be too bouncy while writing. Mine was a bit of a tight fit, but taking it slow and just pushing in the right spot eventually got it to fall into place.
Finally, I wanted to make sure that the box had something dark on the bottom. I went with the “free” option here and just cut out a piece of cardboard to the size of the box and spray painted it black. Any dark fabric or paper or whatever you’ve got laying around would do.
That’s mostly it for the build! To top things off, I ran electrical tape around the edges of the box. I did this to try and help cut down on some of the light bleed, but I’m not sure if it actually helps. Either way, it holds the plexiglass in place too.
Webcam Insanity
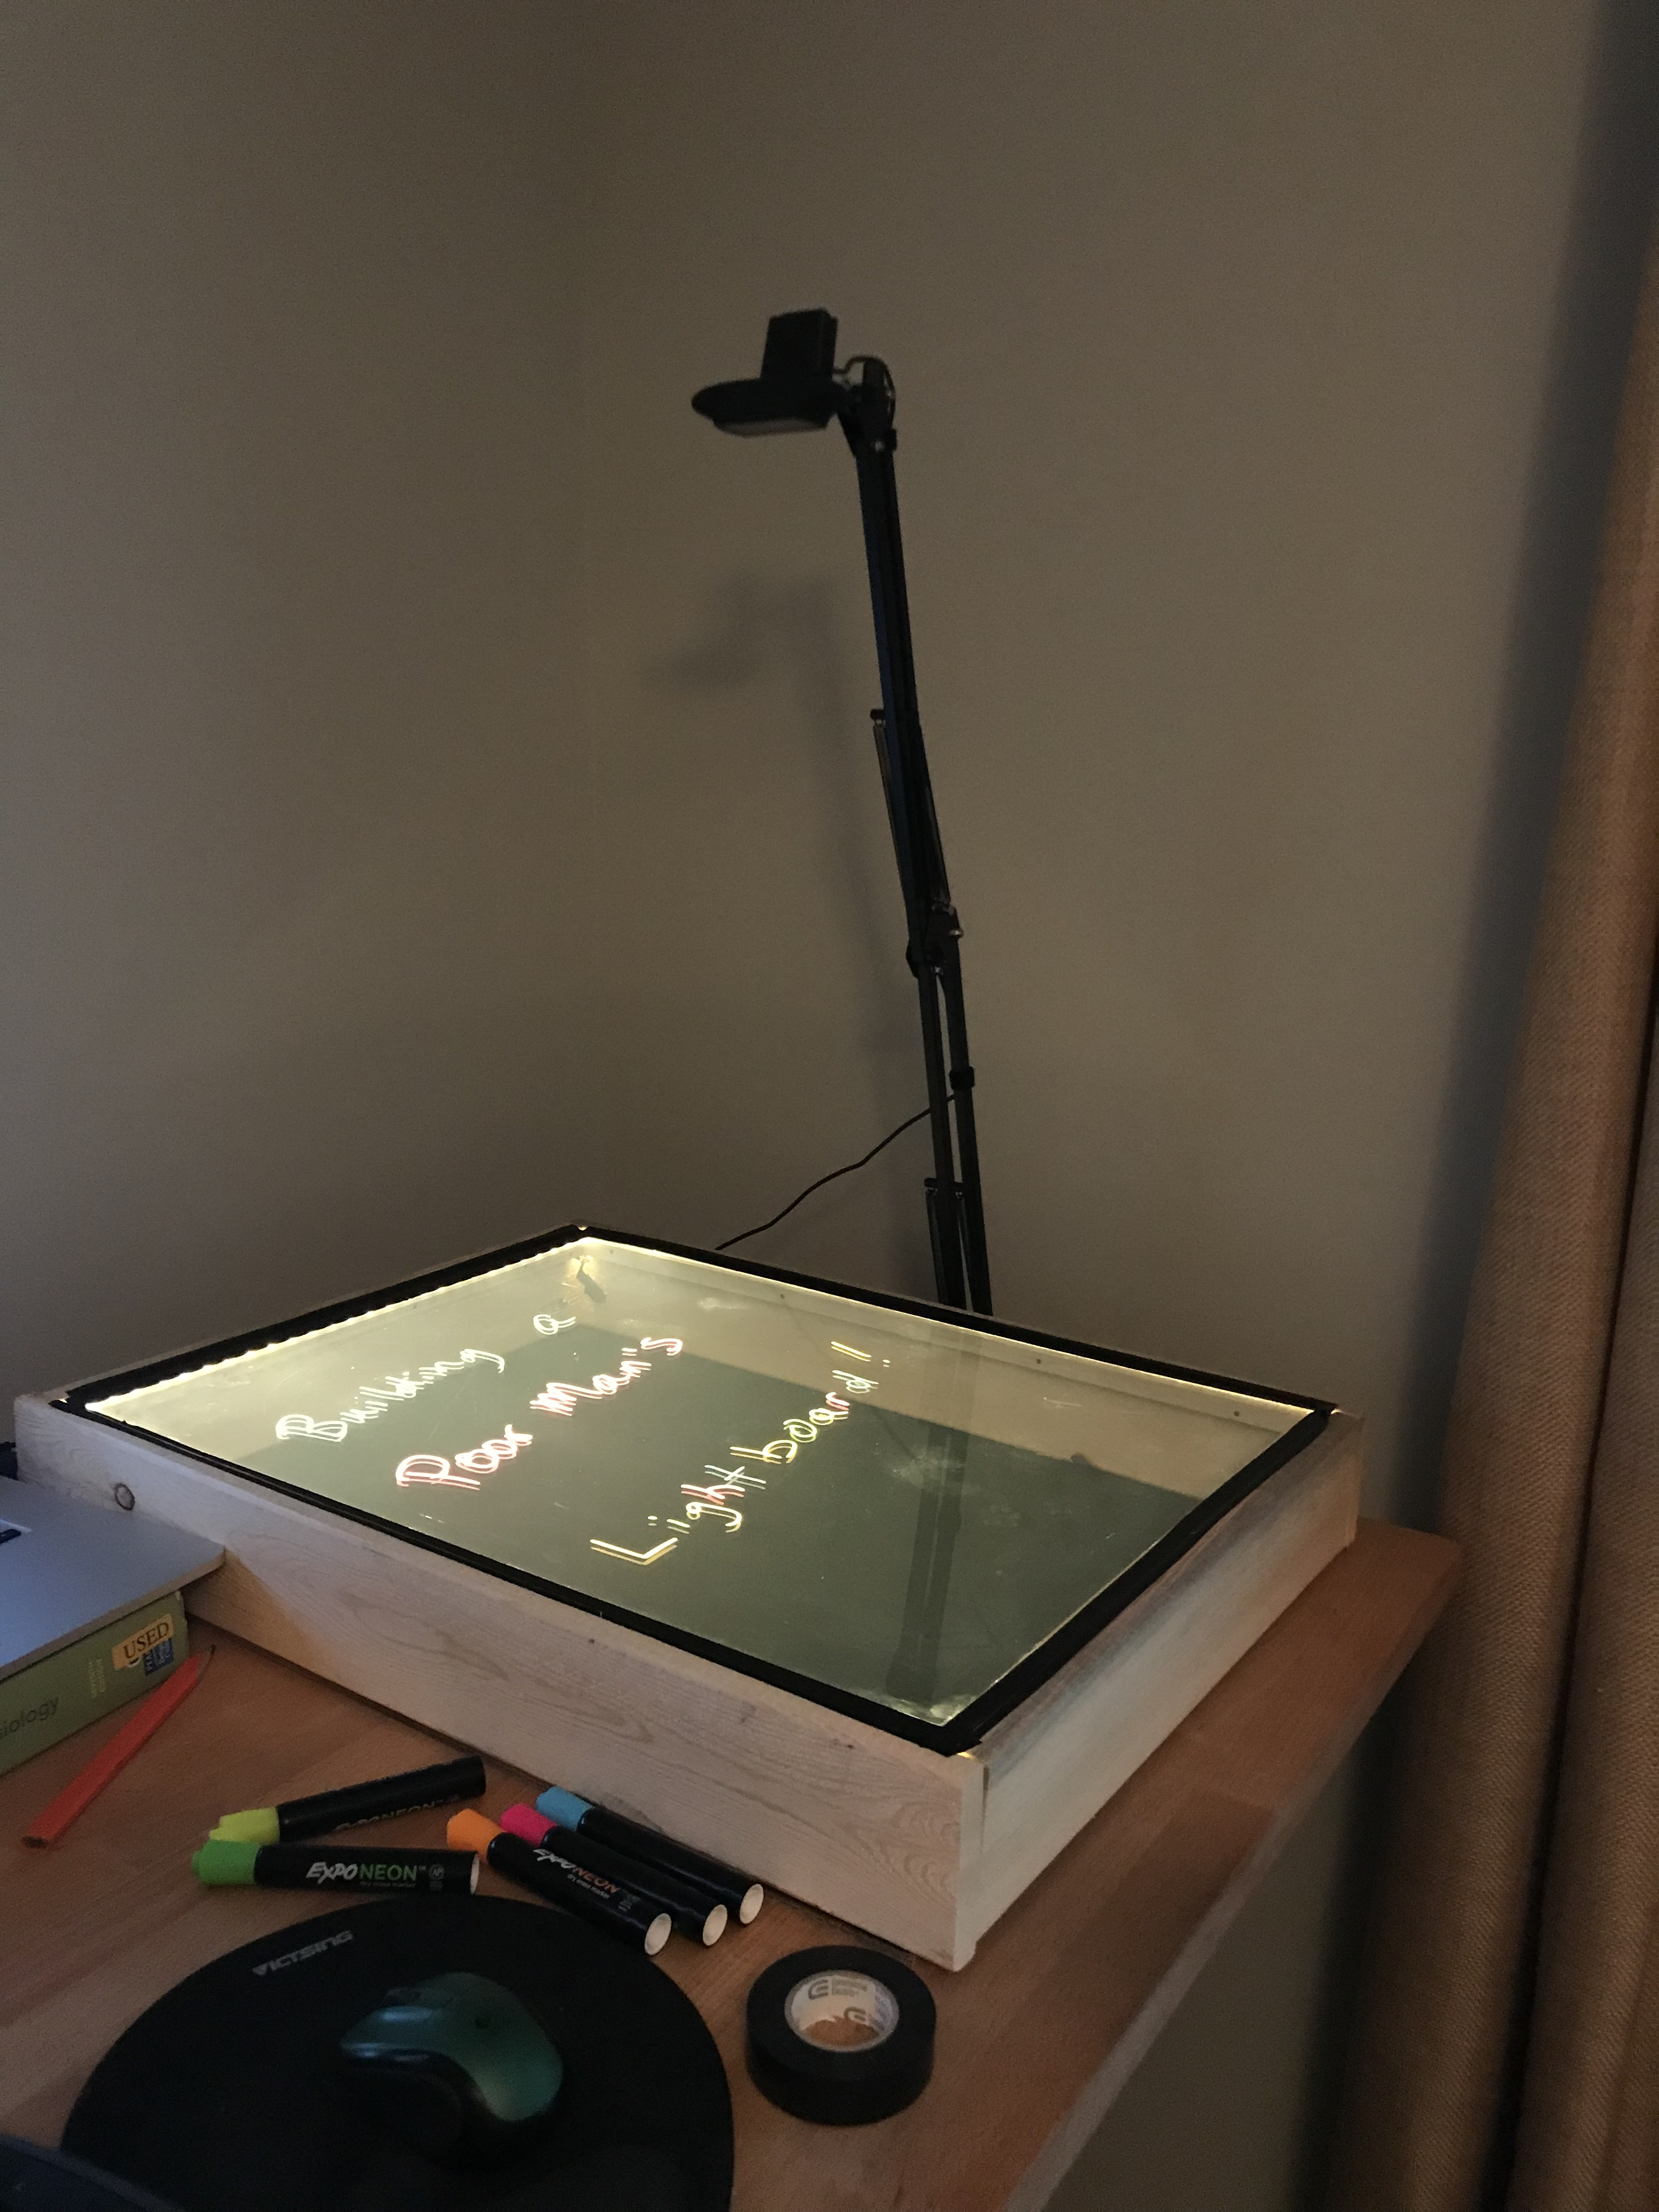
Now that we’ve got the box build, it’s time to get the webcam going. This was pretty straightforward, just attach the arm we bought to the desk and mount the webcam on top of it. Just need to make sure that the webcam is up high enough. I also found that mounting it on the side of my desk allowed for a pretty got field of view on the box. A pic probably does this the most justice:
With the webcam mounted, it was now time to try and get things to look right during a Zoom meeting since my primary goal here was to be able to whiteboard with co-workers. Mac didn’t make this easy. Seems like it’s pretty rare for folks to want to flip their webcam, do some more advanced color tweaks, and all that jazz. I wound up having to buy two apps to make this happen. I feel certain that if you’re using Linux (or maybe even Windows), this can probably be done easier as there seem to be better tools for changing settings.
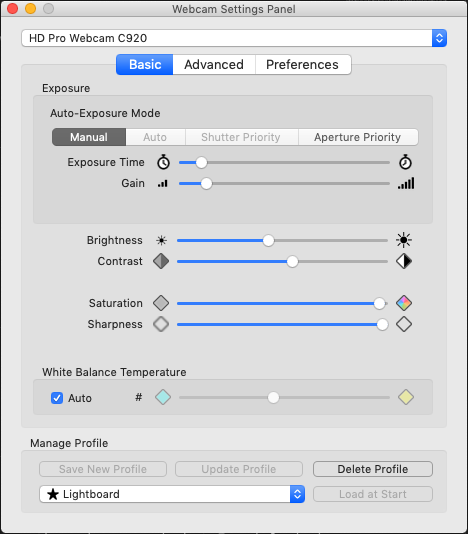
The first is called “Webcam Settings” in the Mac App Store. I feel like the settings for this will be dependent upon the webcam used, but I mainly had to disable auto-zoom, crank up the saturation, and increase the contrast a bit. I followed that by lowering the exposure. This seemed to get me a pretty dark image that gave a pretty decent picture of how a lightboard generally looks. The other nice thing about this app is there’s an opiton to write the settings to the webcam every second. This solves the problem of applications like Zoom which may try to tweak the brightness when you open the app. It’ll flip back to the proper settings quickly.
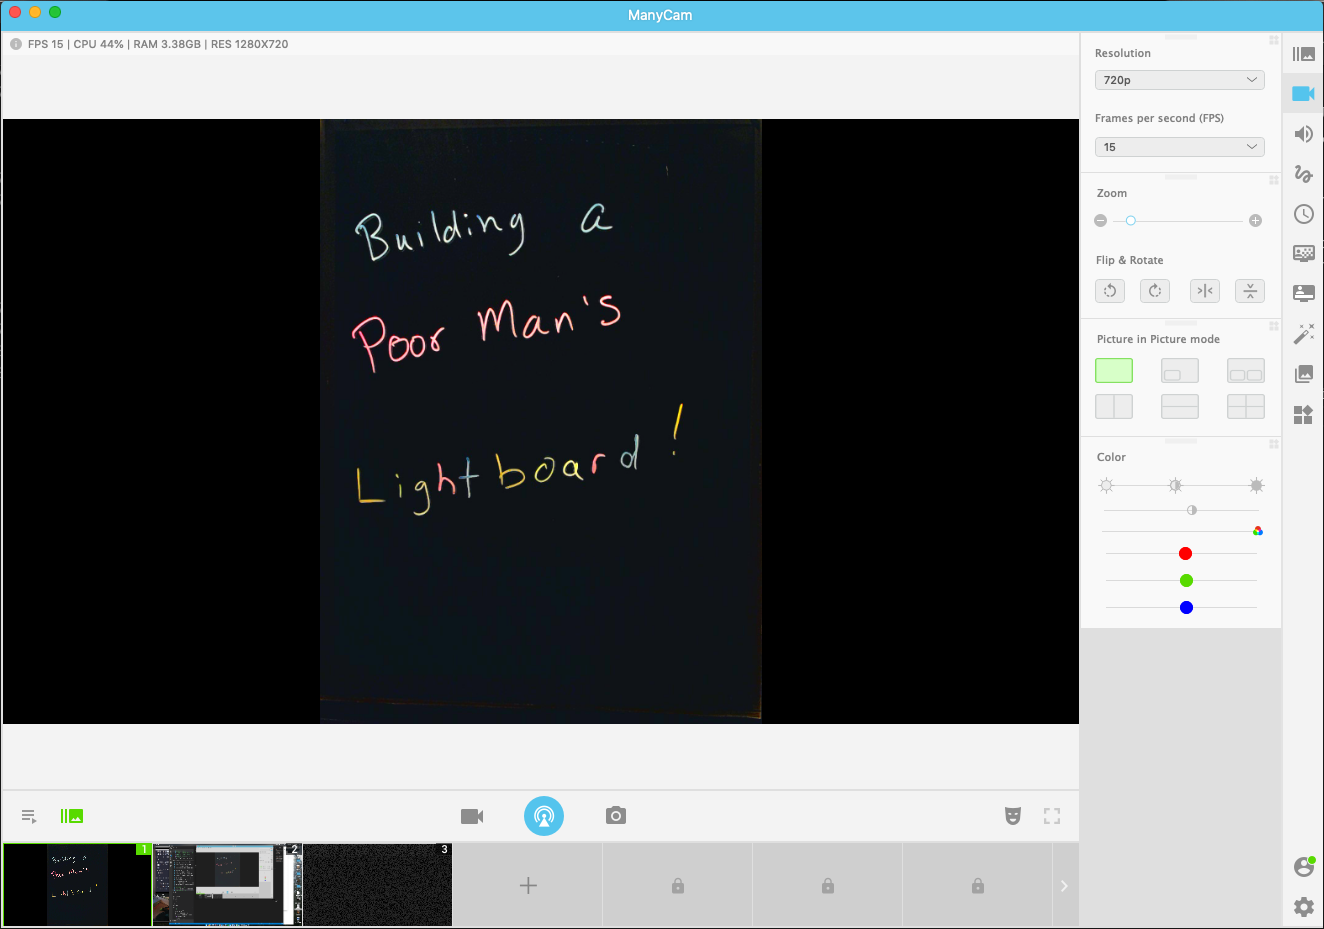
Next comes ManyCam. ManyCam basically performs the function of flipping the webcam picture sideways. Again, your usage of this may differ depending on how you mount the camera or It’s a pretty slick app that can do lots of other stuff as well, like cut between cameras or show your desktop. I imagine I’ll probably use that functionality as well. Once configured, ManyCam creates a “virtual webcam”, which you can select in Zoom. In ManyCam, I also cranked the saturation and lowered the brightness a bit more in addition to zooming in on the picture a bit. For some reason, this looked a bit cleaner than when I did the same in Webcam Settings, so having both paid off. Here’s what the main video screen looks like for me:
Wrap-Up
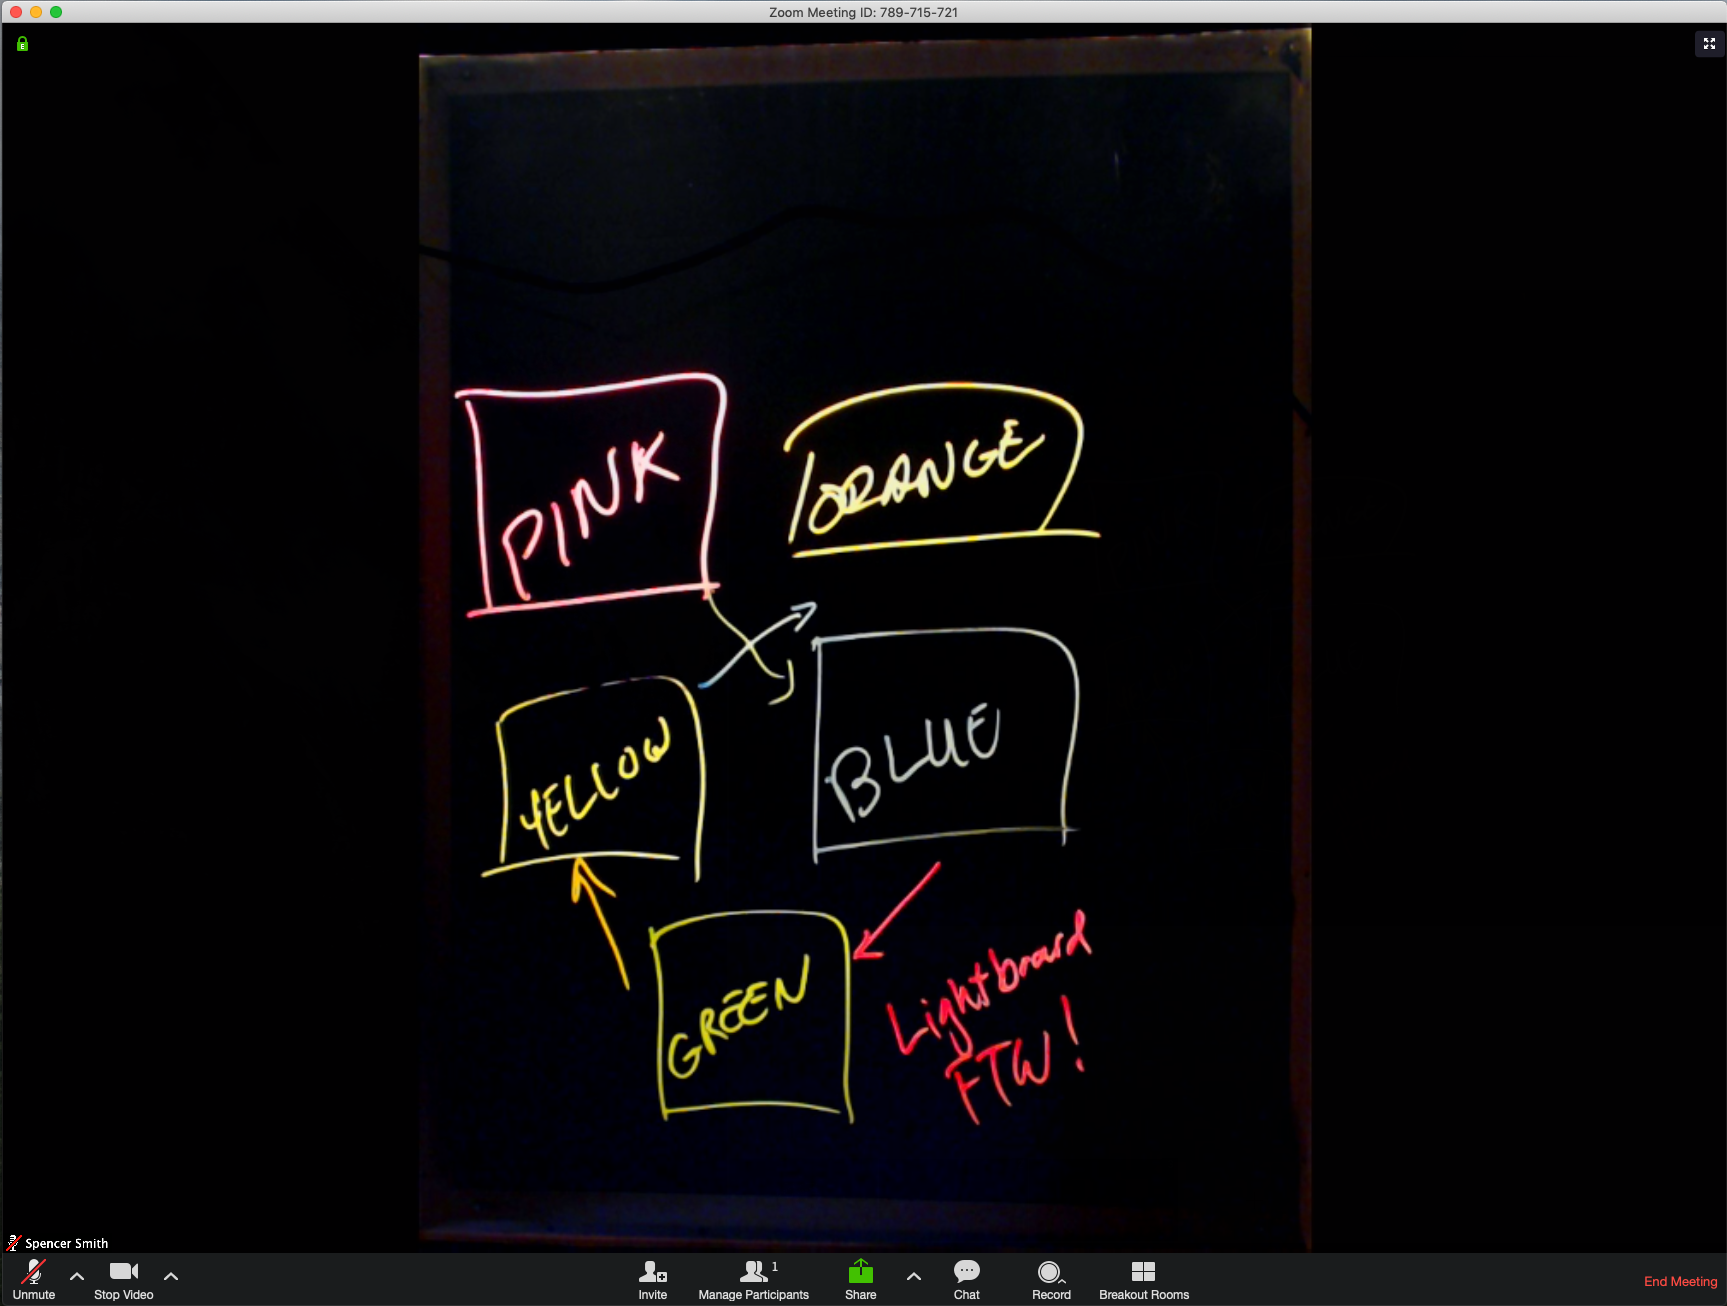
And that’s it! With ManyCam running, you just need to select the virtual webcam when sharing video in a Zoom meeting. Here’s an example of what it looks like:
I’m pretty happy with how this turned out. I’m hoping that I’ll really get some use out of this as I have architecture discussions with my team. Thanks for checking this out!