Wanted to drop a quick how-to on how to report back up to CloudWatch from a CoreOS instance in Amazon. This is a bit of a lab project, something I was thinking about and decided to try. Fair warning that I haven’t used this with any serious workloads or anything.

If you’ve never used it before, CloudWatch is an AWS service that allows you to gather metrics and trigger alarms based on those metrics. This is core to having a robust architecture in Amazon and being able to scale instances in your autoscaling groups. By default, only hypervisor level data is available to act upon: CPU %, Network I/O, or Disk I/O. In order to get some other actionable metrics like disk and RAM usage, we want to make use of the CloudWatch Monitoring Scripts found here.

Containerize Custom Metrics

Let’s bundle all the necessary bits we need to report up to CloudWatch inside of a container image. That is the CoreOS way after all!

  • Create two files, Dockerfile and entrypoint.sh
  • Open Dockerfile for editing:
FROM alpine:3.5

##Install perl packages and pull CloudWatch scripts
RUN apk add --no-cache perl-libwww perl-datetime
RUN wget http://aws-cloudwatch.s3.amazonaws.com/downloads/CloudWatchMonitoringScripts-1.2.1.zip && \
    unzip CloudWatchMonitoringScripts-1.2.1.zip && \
    rm CloudWatchMonitoringScripts-1.2.1.zip
WORKDIR aws-scripts-mon

##Copy entrypoint and make it executable
COPY entrypoint.sh entrypoint.sh
RUN chmod +x entrypoint.sh

##Simply run entrypoint
CMD ./entrypoint.sh
  • And now entrypoint.sh:
#!/bin/sh
while true; do
  ./mon-put-instance-data.pl --mem-util --mem-used --mem-avail \
  --disk-space-avail --disk-space-used --disk-space-util --disk-path=/rootfs \
  --aws-access-key-id $AWS_ACCESS_KEY_ID --aws-secret-key $AWS_SECRET_ACCESS_KEY
  sleep 60
done
  • In the bash script, let’s note that the disk-path we’re pointing to is /rootfs. I couldn’t find a great consensus on whether the value reported inside the container a / was accurate since it points to the overlay. We’ll work around this by mounting the / directory from the host as read only.

Test It

We can see if our container works simply by building and running.

On a CoreOS VM in AWS:

  • docker build -t cloudwatch-mon . (In the same directory as the Dockerfile and entrypoint.sh script)
  • Run the container, filling in the AWS credentials as needed. docker run -ti -e AWS_ACCESS_KEY_ID="abc" \ -e AWS_SECRET_ACCESS_KEY="123" -v /:/rootfs:ro cloudwatch-mon

You should see some output that shows that it’s sending data to CloudWatch:

core@ip-172-31-17-23 ~ $ docker run -ti -e AWS_ACCESS_KEY_ID="aaabbbccc" -e AWS_SECRET_ACCESS_KEY="111222333" -v /:/rootfs:ro cloudwatch-mon

Successfully reported metrics to CloudWatch. Reference Id: 123-00cc-11e7-b3bc-abc


Successfully reported metrics to CloudWatch. Reference Id: 123-00cc-11e7-b3bc-abc


Successfully reported metrics to CloudWatch. Reference Id: 123-00cc-11e7-b3bc-abc
...
  • At this point we can push it to the Docker hub so that we can pull it down on other hosts as well.

Wrap It Up

Now that we’ve got a working Docker image, we can wrap it in a systemd service definition. Note that the same service setup could be added to cloud-config and automatically configured for new hosts.

  • Create a credentials file at /root/.aws/creds. It should look something like:
AWS_ACCESS_KEY_ID="aaabbbccc"
AWS_SECRET_ACCESS_KEY="111222333"
  • Now create a service file at /etc/systemd/system/cloudwatch.service. Populate it with:
[Unit]
Description=cloudwatch docker wrapper
Wants=docker.socket
After=docker.service

[Service]
EnvironmentFile=/root/.aws/creds
User=root
PermissionsStartOnly=true
ExecStart=/usr/bin/docker run -e AWS_ACCESS_KEY_ID=${AWS_ACCESS_KEY_ID} \
-e AWS_SECRET_ACCESS_KEY=${AWS_SECRET_ACCESS_KEY} \
-v /:/rootfs:ro --name=cloudwatch-mon cloudwatch-mon
ExecStartPre=-/usr/bin/docker rm -f cloudwatch-mon
ExecReload=/usr/bin/docker restart cloudwatch-mon
ExecStop=/usr/bin/docker stop cloudwatch-mon
Restart=always
RestartSec=15s

[Install]
WantedBy=multi-user.target
  • Issue sudo systemctl daemon-reload
  • Start the monitoring service with sudo systemctl start cloudwatch
  • You should see that it’s reporting upstream with sudo systemctl status cloudwatch
  • Finally, you can head to the CloudWatch dashboard. The link should look something like: 
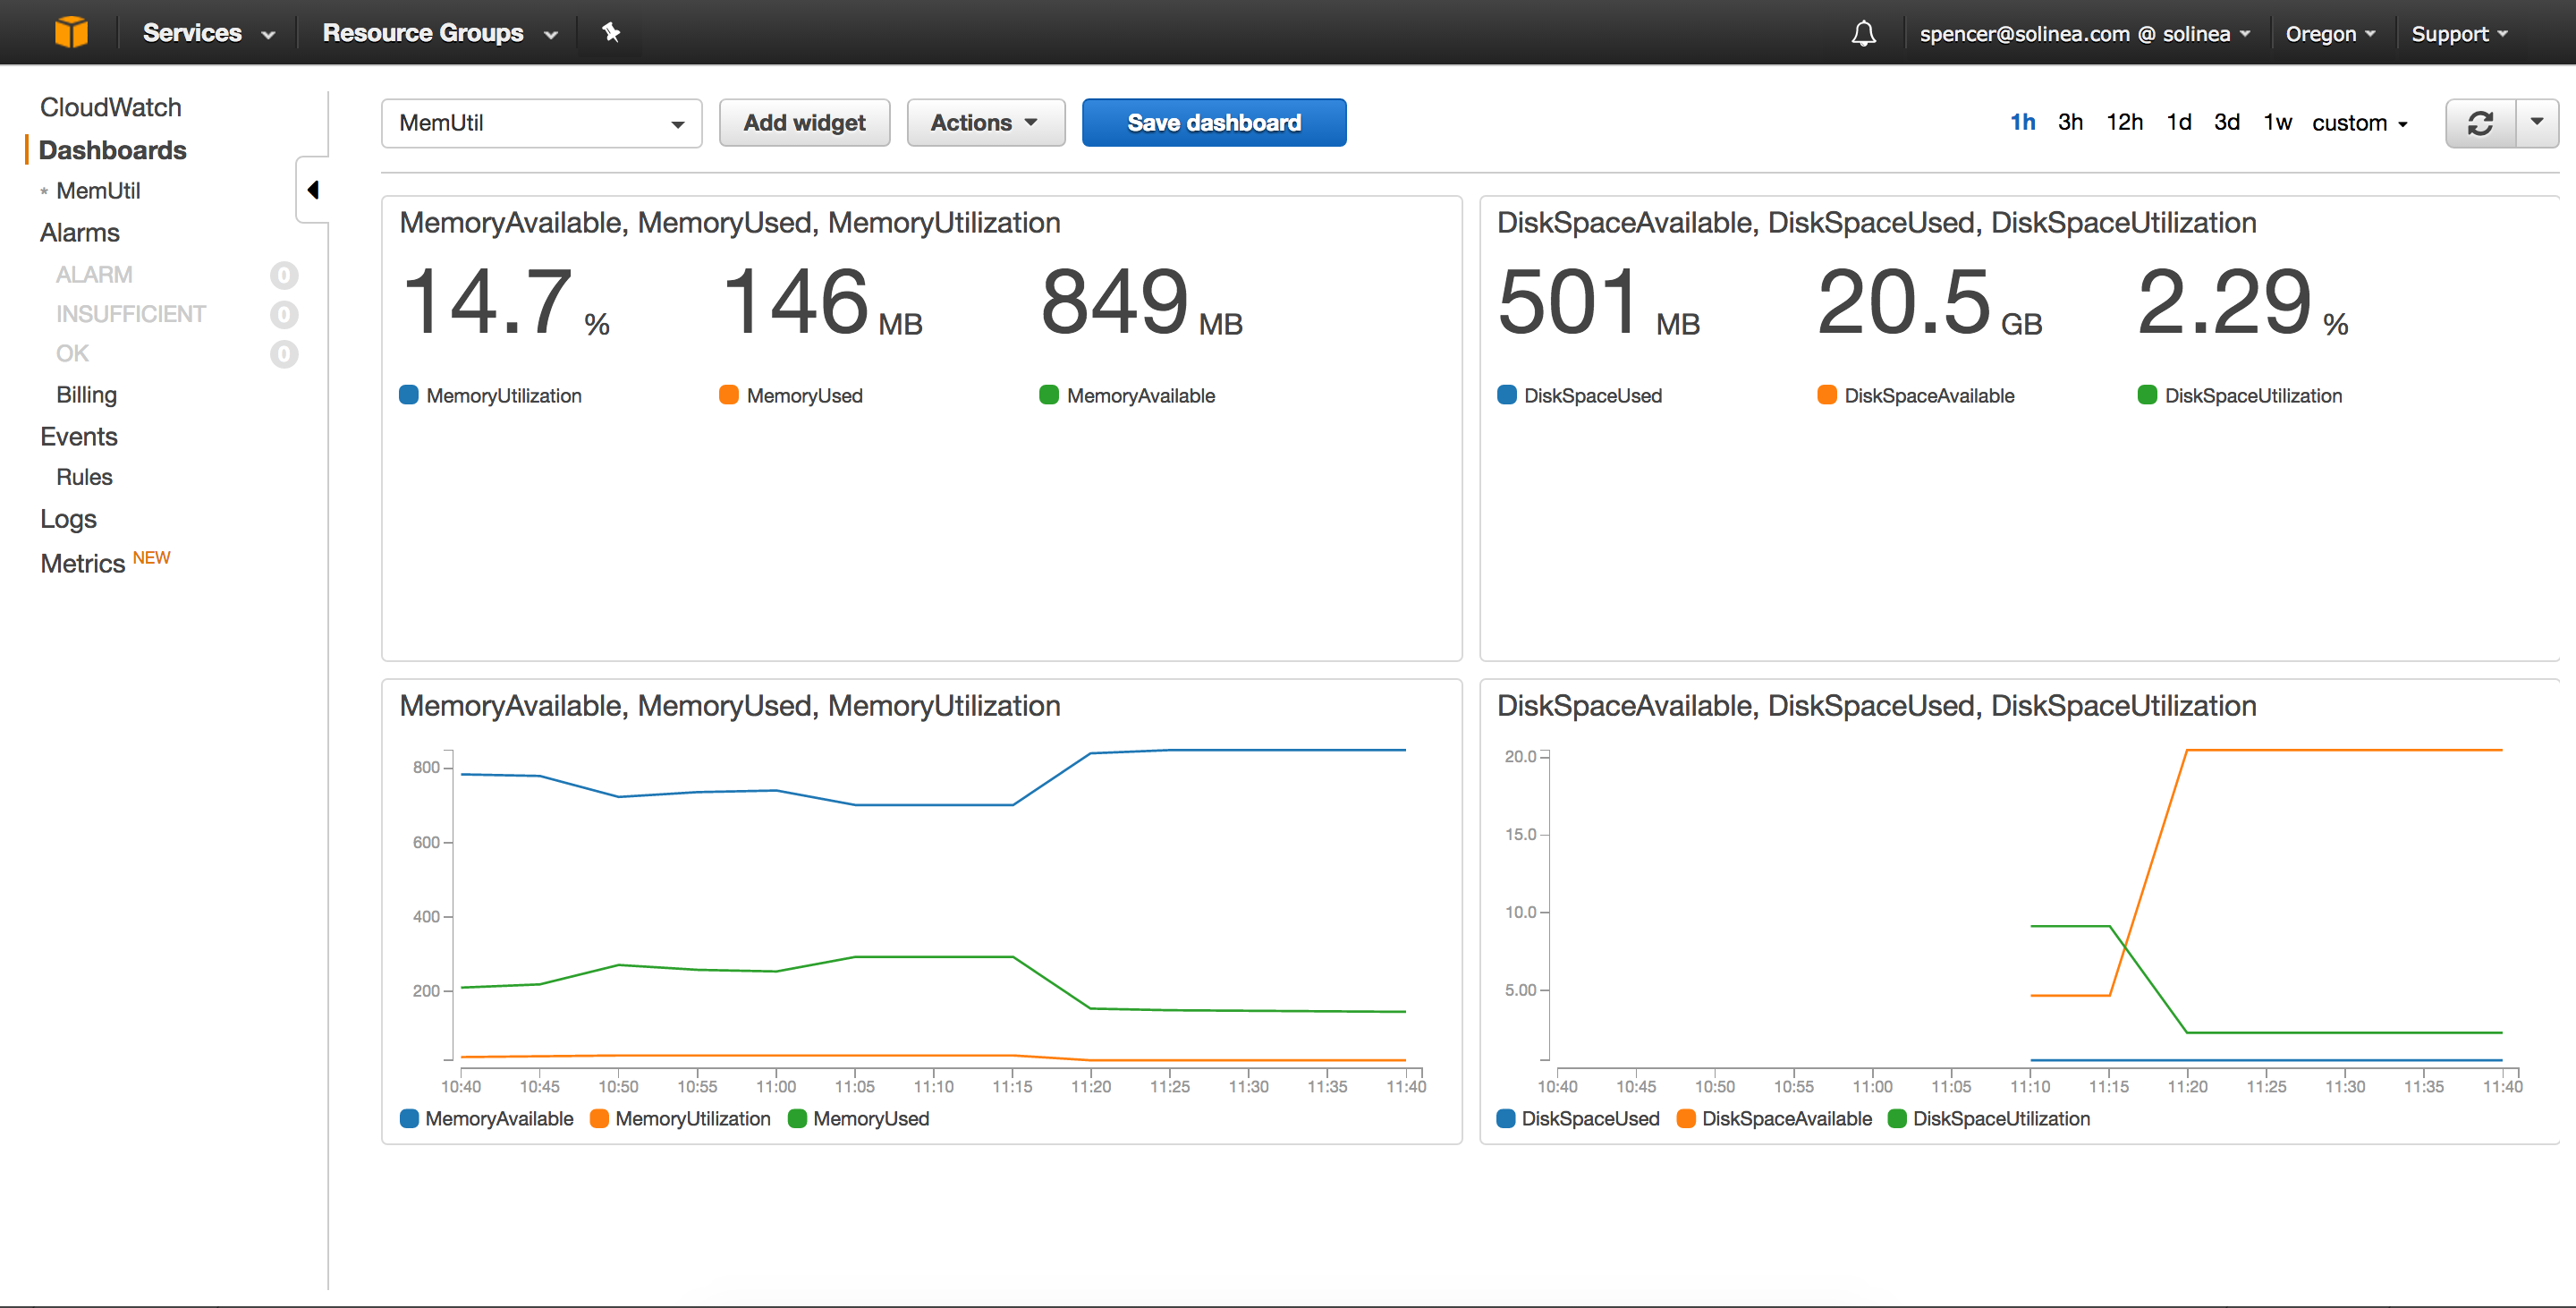
https://us-west-2.console.aws.amazon.com/cloudwatch/home?region=us-west-2
  • Once there, you should see metrics under “Linux System” that show the disk and RAM usage.
  • You can also create some dashboards. Here’s what I was able to quickly mock up:

As a follow-up to yesterday’s post, I wanted to talk about how I built “baconator” at Solinea. This is a goofy Slack bot that we run internally. He responds to requests by querying Google Images for pictures of bacon and then posts them in the channel. Here’s how I did it:

Get the Proper Googly Bits

To get access to Google Images, we need to create a custom search. This gives us some keys and info we need to pass later on.

  • Head to the CSE main page.
  • Click “Create A Custom Search Engine”
  • Fill out the search website by entering “www.google.com”
  • Give a name. I called mine “Google Custom Searcher”

  • Once created, hit the “Public URL” button.
  • Take a look at the search bar in the browser and copy the “cx” portion. We’ll use it later.

Setup an API Key

Once that’s done, we now have to create an API key. I believe you have to have a Google Cloud project already created, so this may involve a couple of steps.

  • Go to the Google developers console’s project page.
  • Add a new project with a name of your choosing.
  • Head to the credentials page for your project. This should be a url like https://console.developers.google.com/apis/credentials?project=$YOUR_PROJECT_NAME
  • Once there, you’ll generate a new API key with “Create Credentials -> API Key”.
  • Copy down the API key, we’ll need it as well.

Phew, now we actually have the bits we need! Let’s get the code together.

Update the Code

Respond Function

First, we want to turn to our respond function that we created last time. What we want to do first is update our accepted phrases to be bacon related, as well as reach out to our next function, receiveBacon. This function will be the one that queries our custom search.

  • Update respond to look like the following:
func respond(rtm *slack.RTM, msg *slack.MessageEvent, prefix string) {
	var response string
	text := msg.Text
	text = strings.TrimPrefix(text, prefix)
	text = strings.TrimSpace(text)
	text = strings.ToLower(text)

	acceptedPhrases := map[string]bool{
		"hook it up":     true,
		"hit me":         true,
		"bacon me":       true,
		"no pork please": true,
	}

	if acceptedPhrases[text] {
		var baconString string
		if text == "no pork please" {
			baconString = "beef+bacon"
		} else {
			baconString = "bacon"
		}
		response = receiveBacon(baconString)
		rtm.SendMessage(rtm.NewOutgoingMessage(response, msg.Channel))
	}
}
  • Note that we’re setting a different search string if we encounter the “no pork please” input. Have to respect the varied diets at Solinea, so we search for “beef bacon” in that case :)

Bring Home the Bacon

Now that we’ve got the respond function setup, let’s add our receiveBacon function. We’ll also create a random function that will simply return a number between a min and max. We’ll use this to make sure we’re seeing fresh bacon each time!

  • Add the two functions. They should look like this:
func random(min, max int) int {
	rand.Seed(time.Now().Unix())
	return rand.Intn(max-min) + min
}

func receiveBacon(baconType string) string {

	cxString := os.Getenv("CX_STRING")
	apiKey := os.Getenv("API_KEY")
	startNum := strconv.Itoa(random(1, 10))
	url := "https://www.googleapis.com/customsearch/v1?cx=" + cxString + "&key=" + apiKey + "&q=" + baconType + "&searchType=image&safe=medium&start=" + startNum
	fmt.Printf(url)
	response, err := http.Get(url)
	if err != nil {
		log.Fatal(err)
	}

	defer response.Body.Close()
	body, err := ioutil.ReadAll(response.Body)
	if err != nil {
		log.Fatal(err)
	}

	var jsonData map[string]interface{}
	if err := json.Unmarshal(body, &jsonData); err != nil {
		log.Fatal(err)
	}

	baconNum := random(0, 9)
	items := jsonData["items"].([]interface{})

	baconData := items[baconNum].(map[string]interface{})
	return baconData["link"].(string)
}

Alright, let’s walk through these functions. Assume that the receiveBacon function has been called with a baconType of simply “bacon”:

  • We grab the custom search and API strings from our environment
  • Generate a random number between 1 and 10. This will correspond to the page on Google Images
  • Craft our request URL and do an http.Get on it
  • Once we’ve got our response, unmarshal the json into the jsonData map
  • Pick on of the 10 responses on the page by generating another random.
  • Return the image link

Once the image link is returned, our respond function simply pops it into Slack so we can enjoy our bacon!

Here’s the entire testbot.go file:

package main

import (
	"encoding/json"
	"fmt"
	"io/ioutil"
	"log"
	"math/rand"
	"net/http"
	"os"
	"strconv"
	"strings"
	"time"

	"github.com/nlopes/slack"
)

func main() {

	token := os.Getenv("SLACK_TOKEN")
	api := slack.New(token)
	api.SetDebug(true)

	rtm := api.NewRTM()
	go rtm.ManageConnection()

Loop:
	for {
		select {
		case msg := <-rtm.IncomingEvents:
			fmt.Print("Event Received: ")
			switch ev := msg.Data.(type) {
			case *slack.ConnectedEvent:
				fmt.Println("Connection counter:", ev.ConnectionCount)

			case *slack.MessageEvent:
				fmt.Printf("Message: %v\n", ev)
				info := rtm.GetInfo()
				prefix := fmt.Sprintf("<@%s> ", info.User.ID)

				if ev.User != info.User.ID && strings.HasPrefix(ev.Text, prefix) {
					respond(rtm, ev, prefix)
				}

			case *slack.RTMError:
				fmt.Printf("Error: %s\n", ev.Error())

			case *slack.InvalidAuthEvent:
				fmt.Printf("Invalid credentials")
				break Loop

			default:
				//Take no action
			}
		}
	}
}

func respond(rtm *slack.RTM, msg *slack.MessageEvent, prefix string) {
	var response string
	text := msg.Text
	text = strings.TrimPrefix(text, prefix)
	text = strings.TrimSpace(text)
	text = strings.ToLower(text)

	acceptedPhrases := map[string]bool{
		"hook it up":     true,
		"hit me":         true,
		"bacon me":       true,
		"no pork please": true,
	}

	if acceptedPhrases[text] {
		var baconString string
		if text == "no pork please" {
			baconString = "beef+bacon"
		} else {
			baconString = "bacon"
		}
		response = receiveBacon(baconString)
		rtm.SendMessage(rtm.NewOutgoingMessage(response, msg.Channel))
	}
}

func random(min, max int) int {
	rand.Seed(time.Now().Unix())
	return rand.Intn(max-min) + min
}

func receiveBacon(baconType string) string {

	cxString := os.Getenv("CX_STRING")
	apiKey := os.Getenv("API_KEY")
	startNum := strconv.Itoa(random(1, 10))
	url := "https://www.googleapis.com/customsearch/v1?cx=" + cxString + "&key=" + apiKey + "&q=" + baconType + "&searchType=image&safe=medium&start=" + startNum
	fmt.Printf(url)
	response, err := http.Get(url)
	if err != nil {
		log.Fatal(err)
	}

	defer response.Body.Close()
	body, err := ioutil.ReadAll(response.Body)
	if err != nil {
		log.Fatal(err)
	}

	var jsonData map[string]interface{}
	if err := json.Unmarshal(body, &jsonData); err != nil {
		log.Fatal(err)
	}

	baconNum := random(0, 9)
	items := jsonData["items"].([]interface{})

	baconData := items[baconNum].(map[string]interface{})
	return baconData["link"].(string)
}

Try It Out

Similar to what we did yesterday, let’s rebuild our go binary and then our Docker image:

  • Build the go binary with GOOS=linux GOARCH=amd64 go build in the directory we created.
  • Create the container image: docker build -t testbot .
  • Run it by adding the new necessary env vars: docker run -ti -e SLACK_TOKEN=xxxxxxxxxxxx -e CX_STRING=11111111:aaaaaa \ -e API_KEY=abcdefghijklmnop123 testbot
  • Enjoy your hard earned bacon! You’ll notice I renamed my bot @baconator.

Hey y’all. Hope everyone is doing well. Today we’ll walk through writing a little bot for Slack using Golang. This is pretty straightforward, so this post will also be short and sweet. That said, a good bot can absolutely be a fun and interesting way to add some extra value to Slack for your org. We have one at Solinea that responds to our requests with pics of bacon. Clearly priceless.

Use What’s Already Out There

I spent some time looking at the different golang options out there for the Slack API. I landed on this one as the one that most folks seem to be using for go. Let’s setup what we need.

  • Create a development directory. I called mine testbot. mkdir testbot; cd testbot;
  • Touch a couple of different files that we’ll use for our bot. touch testbot.go Dockerfile
  • Open up touchbot.go for editing.

Setup Slack##

Before we get any further, we need to get Slack setup properly.

  • Head to https://$YOUR_ORG.slack.com/apps/A0F7YS25R-bots to get to the Bots app page.
  • Hit “Add Configuration”
  • Give your bot a name. Again, I used “@testbot”.

  • Once it’s created, copy the API Token somewhere safe. We’ll need that to connect to Slack.

This should be the minimum that’s necessary for Slack. Feel free to populate the other fields like name, description, etc.

Get Going

The slack library we’re using has some good getting started examples (for all kinds of Slack stuff!), but I just wanted the bare minimum to get a bot to respond.

  • Let’s populate touchbot.go with the following:
package main

import (
	"fmt"
	"os"
	"strings"

	"github.com/nlopes/slack"
)

func main() {

	token := os.Getenv("SLACK_TOKEN")
	api := slack.New(token)
	rtm := api.NewRTM()
	go rtm.ManageConnection()

Loop:
	for {
		select {
		case msg := <-rtm.IncomingEvents:
			fmt.Print("Event Received: ")
			switch ev := msg.Data.(type) {
			case *slack.ConnectedEvent:
				fmt.Println("Connection counter:", ev.ConnectionCount)

			case *slack.MessageEvent:
				fmt.Printf("Message: %v\n", ev)
				info := rtm.GetInfo()
				prefix := fmt.Sprintf("<@%s> ", info.User.ID)

				if ev.User != info.User.ID && strings.HasPrefix(ev.Text, prefix) {
					rtm.SendMessage(rtm.NewOutgoingMessage("What's up buddy!?!?", ev.Channel))
				}

			case *slack.RTMError:
				fmt.Printf("Error: %s\n", ev.Error())

			case *slack.InvalidAuthEvent:
				fmt.Printf("Invalid credentials")
				break Loop

			default:
				//Take no action
			}
		}
	}
}

Let’s walk through some of this. The general flow goes:

  • Retrieve a Slack API token from our environment variables.
  • Connect to Slack using the token and loop endlessly.
  • When we receive an event, take action depending on what type of an event it is.

Now, there’s other types of events that can be present, but these are the ones that give enough quick feedback to troubleshoot an error.

There’s a couple of other important bits when a “MessageEvent” occurs:

  • Get some basic info about our Slack session, just so we can fish our bot’s user name out of it.
  • Set a prefix that should be met in order to warrant a response from us. This will look like @testbot<space> for me.
  • If the original message wasn’t posted by our bot AND it contains our prefix @testbot, then we’ll respond to the channel. For now, we’ll only respond with “What’s up buddy!?!?”

Bring On The Bots

That’s actually enough to get a bot connected and responding. Let’s check it out and then we’ll make it better.

  • From your terminal, set a SLACK_TOKEN env variable with the value we got earlier from the bot configuration. export SLACK_TOKEN="xxxyyyzzz111222333"
  • Run your bot with go run testbot.go. This should show some terminal output that looks like it’s connecting to slack and reading some early events.
  • In your slack client, invite testbot to a channel of your choosing. /invite @testbot

  • Now, let’s see if our buddy responds. Type something like @testbot hey!. You should see:

But Wait, There’s More

Sweet! It works! But you’ll probably notice pretty quick that if the only thing you’re looking for is the prefix, testbot is going to respond to ANYTHING you say to it. That can get a bit annoying. Let’s draft a responder and we can filter things out a bit.

  • Create a function below your main function called “respond”. This code block should look like this:
func respond(rtm *slack.RTM, msg *slack.MessageEvent, prefix string) {
	var response string
	text := msg.Text
	text = strings.TrimPrefix(text, prefix)
	text = strings.TrimSpace(text)
	text = strings.ToLower(text)

	acceptedGreetings := map[string]bool{
		"what's up?": true,
		"hey!":       true,
		"yo":         true,
	}
	acceptedHowAreYou := map[string]bool{
		"how's it going?": true,
		"how are ya?":     true,
		"feeling okay?":   true,
	}

	if acceptedGreetings[text] {
		response = "What's up buddy!?!?!"
		rtm.SendMessage(rtm.NewOutgoingMessage(response, msg.Channel))
	} else if acceptedHowAreYou[text] {
		response = "Good. How are you?"
		rtm.SendMessage(rtm.NewOutgoingMessage(response, msg.Channel))
	}
}
  • Looking through this code block. We’re basically just receiving the message that came through and, from here, we’ll determine if it warrants a response.
  • There’s two maps that contain some accepted strings. For this example, we’re just accepting some greetings and some “how are you?” type or questions.
  • If those strings are matched, a message is sent in response.

Now, we want to update our main function to use the respond function instead of posting messages directly. Your whole file should look like this:

package main

import (
	"fmt"
	"os"
	"strings"

	"github.com/nlopes/slack"
)

func main() {

	token := os.Getenv("SLACK_TOKEN")
	api := slack.New(token)
	api.SetDebug(true)

	rtm := api.NewRTM()
	go rtm.ManageConnection()

Loop:
	for {
		select {
		case msg := <-rtm.IncomingEvents:
			fmt.Print("Event Received: ")
			switch ev := msg.Data.(type) {
			case *slack.ConnectedEvent:
				fmt.Println("Connection counter:", ev.ConnectionCount)

			case *slack.MessageEvent:
				fmt.Printf("Message: %v\n", ev)
				info := rtm.GetInfo()
				prefix := fmt.Sprintf("<@%s> ", info.User.ID)

				if ev.User != info.User.ID && strings.HasPrefix(ev.Text, prefix) {
					respond(rtm, ev, prefix)
				}

			case *slack.RTMError:
				fmt.Printf("Error: %s\n", ev.Error())

			case *slack.InvalidAuthEvent:
				fmt.Printf("Invalid credentials")
				break Loop

			default:
				//Take no action
			}
		}
	}
}

func respond(rtm *slack.RTM, msg *slack.MessageEvent, prefix string) {
	var response string
	text := msg.Text
	text = strings.TrimPrefix(text, prefix)
	text = strings.TrimSpace(text)
	text = strings.ToLower(text)

	acceptedGreetings := map[string]bool{
		"what's up?": true,
		"hey!":       true,
		"yo":         true,
	}
	acceptedHowAreYou := map[string]bool{
		"how's it going?": true,
		"how are ya?":     true,
		"feeling okay?":   true,
	}

	if acceptedGreetings[text] {
		response = "What's up buddy!?!?!"
		rtm.SendMessage(rtm.NewOutgoingMessage(response, msg.Channel))
	} else if acceptedHowAreYou[text] {
		response = "Good. How are you?"
		rtm.SendMessage(rtm.NewOutgoingMessage(response, msg.Channel))
	}
}

Final Test

  • Fire up your bot again with go run testbot.go
  • The bot should already be connected to your previous channel
  • Greet your bot with @testbot hey!
  • Your bot will respond with our greeting response.
  • Test out the second response: @testbot how's it going?

Build and Run

This section will be quick. Let’s build a container image with our go binary in it. We’ll then be able to run it with Docker.

  • Add the following to your Dockerfile:
FROM alpine:3.4

RUN apk add --no-cache ca-certificates

ADD testbot testbot
RUN chmod +x testbot

CMD ["./testbot"]
  • Build the go binary with GOOS=linux GOARCH=amd64 go build in the directory we created.
  • Create the container image: docker build -t testbot .
  • We can now run our container (anywhere!) with docker run -d -e SLACK_TOKEN=xxxyyyzzz111222333 testbot

A co-worker of mine was having some issues with KubeDNS in his GKE environment. He was then asking how to see if records had actually been added to DNS and I kind of shrugged (via Slack). But this got me a bit curious. How in the heck do you look and see? I thought the answer was at least worth writing down and remembering.

It’s Just etcd

The KubeDNS pod consists of four containers: etcd, kube2sky, exechealthz, and skydns. It’s kind of self-explanatory what each do, but etcd is a k/v store that holds the DNS records, kube2sky takes Kubernetes services and pods and updates etcd, and skydns is, guess what, a DNS server that uses etcd as its backend. So it looks like all roads point to etcd as far as where our records live.

Checking It Out

Here’s how to look at the records in the etcd container:

  • Find the full name of the pod for kube-dns with kubectl get po --all-namespaces. It should look like kube-dns-v11-xxxxx

  • Describe the pod to list the containers with kubectl describe po kube-dns-v11-xxxxx --namespace=kube-system. We already know what’s there, but it’s helpful anyways.

  • We will now exec into the etcd container and use it’s built-in tools to get the data we want. kubectl exec -ti --namespace=kube-system kube-dns-v11-xxxxx -c etcd -- /bin/sh

  • Once inside the container, let’s list all of the services in the default namespace (I’ve only got one):

# etcdctl ls skydns/local/cluster/svc/default

/skydns/local/cluster/svc/default/kubernetes
  • Now, find the key for that service by calling ls again:
# etcdctl ls skydns/local/cluster/svc/default/kubernetes

/skydns/local/cluster/svc/default/kubernetes/8618524b
  • Finally, we can return the data associated with that key by using the get command!
# etcdctl get skydns/local/cluster/svc/default/kubernetes/8618524b

{"host":"10.55.240.1","priority":10,"weight":10,"ttl":30,"targetstrip":0}

Other Notes

If you want to also test that things are working as expected inside the cluster, follow the great “How Do I Test If It’s Working?” section in the DNS addon repo here

As a follow-on from yesterday’s post, I want to chat some more about the things you could do with the k8s-sniffer go app we created. Once we were able to detect pods in the cluster, handler functions were called when a new pod was created or an existing pod was removed. These handler functions were just printing out to the terminal in our last example, but when you start thinking about it a bit more, you could really do anything you want with that info. We could post pod info to some global registry of systems, we could act upon the metadata for the pods in some way, or we could do something fun like post it to Slack as a bot. Which option do you think I chose?

Setting Up Slack

In order to properly communicate with Slack, you will need to set up an incoming webhook.

  • Incoming webhooks are an app you add to Slack. You can find the app here.

  • Once this is done, you can configure a new hook. In the “Add Configuration” page, simply select the Slack channel you would like to post to.

  • On the next page, save the Webhook URL that is supplied to you and edit the information about your bot as necessary. I added a Kubernetes logo and changed his name to “k8s-bot”.

Posting To Slack

So with our webhook setup, we are now ready to post to our channel when events occur in the Kubernetes cluster. We will achieve this by adding a new function “notifySlack”.

  • Add the “notifySlack” method to your k8s-sniffer.go file above the “podCreated” and “podDeleted” functions:
func notifySlack(obj interface{}, action string) {
	pod := obj.(*api.Pod)
	
	//Incoming Webhook URL
    url := "https://hooks.slack.com/your/webhook/url"
	
	//Form JSON payload to send to Slack
	json := `{"text": "Pod ` + action + ` in cluster: ` + pod.ObjectMeta.Name + `"}`

    //Post JSON payload to the Webhook URL
	client := http.Client{}

	req, err := http.NewRequest("POST", url, bytes.NewBufferString(json))
	req.Header.Set("Content-Type", "application/json")

	_, err = client.Do(req)
	if err != nil {
		fmt.Println("Unable to reach the server.")
	}

}
  • Update the url variable with your correct Webhook URL.

  • Notice that the function takes an interface and a string as input. This allows us to pass in the pod object that is caught by the handlers, as well as a string indicating whether that pod was added or deleted.

  • With this method in place, it’s dead simple to update our handler functions to call it instead of outputting to the terminal. Update “podCreated” and “podDeleted” to look like the following:

func podCreated(obj interface{}) {
	notifySlack(obj, "created")
}

func podDeleted(obj interface{}) {
	notifySlack(obj, "deleted")
}
  • The full file will now look like:
package main

import (
	"bytes"
	"fmt"
	"log"
	"net/http"
	"time"

	"k8s.io/kubernetes/pkg/api"
	"k8s.io/kubernetes/pkg/client/cache"
	"k8s.io/kubernetes/pkg/client/restclient"
	client "k8s.io/kubernetes/pkg/client/unversioned"
	"k8s.io/kubernetes/pkg/controller/framework"
	"k8s.io/kubernetes/pkg/fields"
	"k8s.io/kubernetes/pkg/util/wait"
)

func notifySlack(obj interface{}, action string) {
	pod := obj.(*api.Pod)
	
	//Incoming Webhook URL
    url := "https://hooks.slack.com/your/webhook/url"
	
	//Form JSON payload to send to Slack
	json := `{"text": "Pod ` + action + ` in cluster: ` + pod.ObjectMeta.Name + `"}`

    //Post JSON payload to the Webhook URL
	client := http.Client{}

	req, err := http.NewRequest("POST", url, bytes.NewBufferString(json))
	req.Header.Set("Content-Type", "application/json")

	_, err = client.Do(req)
	if err != nil {
		fmt.Println("Unable to reach the server.")
	}

}

func podCreated(obj interface{}) {
	notifySlack(obj, "created")
}

func podDeleted(obj interface{}) {
	notifySlack(obj, "deleted")
}

func watchPods(client *client.Client, store cache.Store) cache.Store {

	//Define what we want to look for (Pods)
	watchlist := cache.NewListWatchFromClient(client, "pods", api.NamespaceAll, fields.Everything())

	resyncPeriod := 30 * time.Minute

	//Setup an informer to call functions when the watchlist changes
	eStore, eController := framework.NewInformer(
		watchlist,
		&api.Pod{},
		resyncPeriod,
		framework.ResourceEventHandlerFuncs{
			AddFunc:    podCreated,
			DeleteFunc: podDeleted,
		},
	)

	//Run the controller as a goroutine
	go eController.Run(wait.NeverStop)
	return eStore
}

func main() {

	//Configure cluster info
	config := &restclient.Config{
		Host:     "https://xxx.yyy.zzz:443",
		Username: "kube",
		Password: "supersecretpw",
		Insecure: true,
	}

	//Create a new client to interact with cluster and freak if it doesn't work
	kubeClient, err := client.New(config)
	if err != nil {
		log.Fatalln("Client not created sucessfully:", err)
	}

	//Create a cache to store Pods
	var podsStore cache.Store

	//Watch for Pods
	podsStore = watchPods(kubeClient, podsStore)

	//Keep alive
	log.Fatal(http.ListenAndServe(":8080", nil))
}

Posted Up

Alright, now when we fire up our go application, we will see posts to our channel in Slack. Remember, the first few will happen quickly, as the store of our pods is populated.

  • Run with go run k8s-sniffer.go

  • View the first few posts to Slack:

  • Try scaling down an RC to see the delete: kubectl scale rc test-rc --replicas=0

Hope this helps!