As I wrote previously, I wanted to learn to use Github Pages to build a new blog and start keeping track of my personal projects and ideas. However, in getting started, I noticed that there really wasn’t a straightforward way to move from Github’s quick and dirty tutorial to actually creating a useful blog. There’s some tools like Jekyll Bootstrap, but it seems like it’s been a while since it has been updated. So after combing through a lot of other people’s pages and some Jekyll tutorials, I was finally able to get something presentable up and running. I figured I’d share the overall process I used as a first series of posts, in case someone else finds it useful.

This first post will center around getting a development environment setup and creating a “Hello, World!” type page to demonstrate the basics. So without further ado…

This guide assumes a standard Ubuntu installation and a pre-existing Github account.

###Create Our Github Page

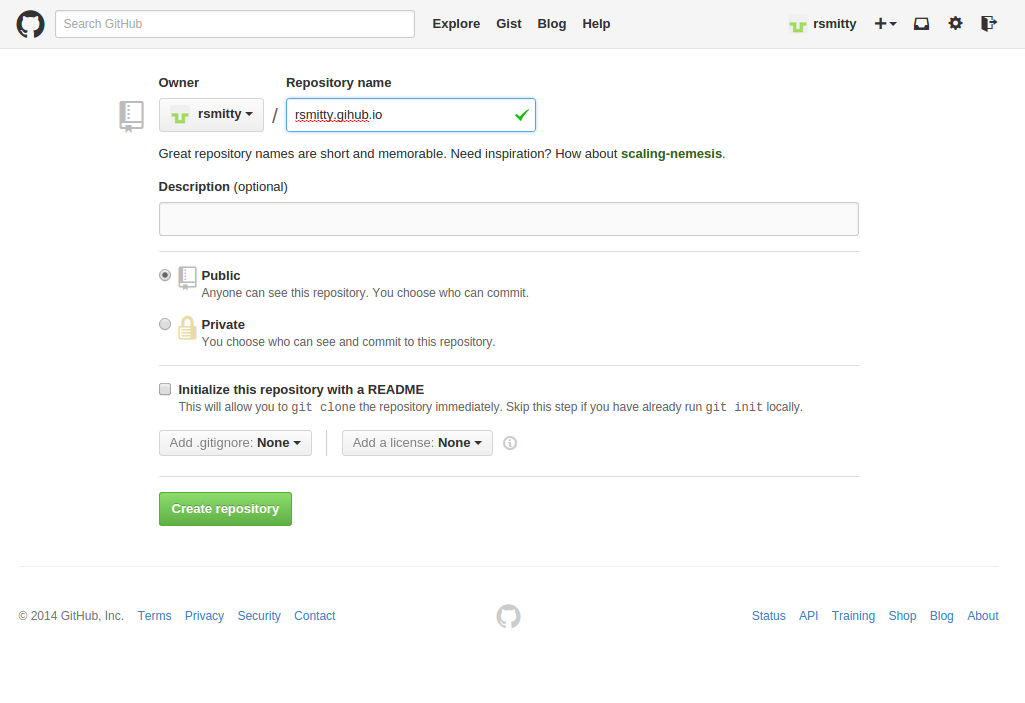
  • First, we’ll want to create an empty repo out on Github. The naming here is quite important, so for a personal blog, you’ll want to name it like GITHUB_USERNAME.github.io. So login to Github and click “+ New Repository”. My repo info looked like this:

  • Now, let’s clone our repo locally. This should be as simple as a git clone https://github.com/USERNAME/USERNAME.github.io.git in some place that you’re comfortable with. If you change into that directory, you’ll see it’s currently empty, unless you created a README or LICENSE file as part of your repo creation.

Note: If you don’t have git installed, issue sudo apt-get install git to install.

###Install The Basics

  • Let’s grab some packages we need to serve our site locally. This will be useful when writing posts, so you don’t have to push to Github constantly just to see what it looks like. Issue sudo apt-get install ruby ruby1.9.1-dev python-pip.

  • We’ll need a Javascript parser and the Jekyll gem, so get NodeJS and Jekyll from rubygems: sudo gem install node jekyll

  • This step is optional for some, but I needed syntax highlighting for code blocks. So install the Pygments package for Python: sudo pip install Pygments

###Create Our Folder Structure

There’s a certain folder structure that Jekyll looks for in your repo. For example, all posts must live in the ‘_posts’ folder and must be titled like YEAR-MONTH-DAY-TITLE.FORMAT. To help understand, the title of this post is 2014-09-06-creating-a-blog-1.md. Anyways, I wanted to get up and running with the absolute basic amount of stuff needed in my repo so here’s what seemed to work.

  • Change into your repo directory in a terminal. Create two directories, _layouts and _posts. They must be named exactly that, including the underscore at the front. Issue mkdir _layouts _posts

  • Let’s also touch a couple of files that we’ll use later on. Issue touch _config.yml index.html

###Configure The Site

  • We could probably do this part much later in the tutorial, but let’s go ahead and put some basic info about our site in the _config.yml file. Feel free to edit these fields to your liking, with the exception of the ‘highlighter’ option. That is for our code highlighting.
name: "Test Blog"

description: "A snazzy new blog, just for me!"

about: "Here's a bit of text that we'll put in an about section later on in our tutorial. I'm intentionally making it a little longer so that the section will look fuller later..."

highlighter: pygments

###Test Our Local Server

  • Now, what’s a tutorial without a “Hello, World!” portion? Let’s go ahead and edit index.html to say that. The “Hello, World!” text should be the only thing in the file.

  • In the root of your repo, let’s tell Jekyll to server our pages so we can see if everything works. Issue jekyll serve --watch. The watch flag will monitor the repo for changed files and regenerate automatically, so you don’t have to start/stop the process. However, I’ve noticed that’s not the case for certain files, namely _config.yml. Your terminal should look something like this when you start the process:

Configuration file: /home/rsmitty/Desktop/rsmitty.github.io/_config.yml
            Source: /home/rsmitty/Desktop/rsmitty.github.io
       Destination: /home/rsmitty/Desktop/rsmitty.github.io/_site
      Generating...
                    done.
 Auto-regeneration: enabled for '/home/rsmitty/Desktop/rsmitty.github.io'
Configuration file: /home/rsmitty/Desktop/rsmitty.github.io/_config.yml
    Server address: http://0.0.0.0:4000/
  Server running... press ctrl-c to stop.
  • Open the address http://localhost:4000 in a browser and you should see your “Hello, World!” text. Neat!

###Check It Out On Github

Okay, so we’ve got our first official page. How do we get that out to Github? Turns out, it’s really easy, because we’ve already got everything laid out just right locally.

  • Add all of our files to be commited: git add --all

  • Commit them with a helpful message: git commit -m "Committing basic folder structure and Hello World page."

  • Push it to Github: git push origin master

  • Give it a few seconds, and you should see your new page at your USERNAME.github.io address:

###Closing That’s it for part one of this tutorial. We’ve now got a development environment setup and know how to push our pages to Github. In part two, we’ll explore how to use Bootstrap to setup a blog layout and create some custom layout pages so that our site looks clean and user friendly.

Welp, after a long time away from anything blog related, I’ve decided to spin up a new site to start trying to keep better documentation of the stuff I do personally. A friend of mine asked about my old blog last week and, after telling me that he had liked to read it, I decided that maybe now was as good a time as any to get back into the swing of things. Life has changed quite a bit since the old entries I had made on my previous site, so the focus of my write-ups here will be pretty drastically different.

I had originally stopped writing mainly because, as graduation neared at Clemson, I was short on time and frantically trying to find a job to transition to ASAP. I also didn’t want to pay yearly for a domain name and to host my site somewhere. So in getting back into this, I have made the transition to Github Pages as a free spot to host my stuff. Pages uses the Jekyll framework to host static sites, which sounded like a neat platform to try out. This has also given me a chance to use git in a different way and learn the markdown syntax. I hope that I’ll be able to expand on these skills more in the future.

As for most of my new posts, they’ll probably center around the creation of this site (it took me a while to figure out the simplest path forward for Jekyll + Bootstrap), Linux system administration, OpenStack oddities and how-tos, and automation tools like Chef and Ansible. Finally, in regards to my older stuff, I was able to dig the old site out of the archive.org Wayback Machine (hooray for not keeping backups), so I’ve ported a few of the ones that were still somewhat interesting to this site.

Hope you like it!

Back in CPSC 101, we did a lot of image editing. We only used PPM images in class and I was thinking the other day about how even though I hated the project at the time, it was pretty interesting. So, I decided to re-code some of it in Python. Basically, all I’ve done is written a script that will allow the conversion of any color PPM image into greyscale. I feel like this can be pretty handy, as it’s fast and seems to do a pretty good job.

Here’s the before image (Ironically, I had to convert to another image format before posting):

alt text

And here’s the output:

alt text

A few particulars about the files and scripts:

  • I used the P3 header, which is easier because it allows you just to write ASCII into the file.

  • Also, you must ensure that the header of the input photo must only have 3 lines. I’ve found that if you convert a JPEG from Gimp, it adds its on line in the header. It was easy to just do ‘nano in.ppm’ in terminal and remove the line they put in.

  • The script can be run using ‘python grey.py <input filename>’

  • This ONLY works on PPM images. Maybe someday I’ll look into another image format.

And that’s it!

Here’s the code, check it out:

#Greyscale Converter
#Spencer Smith
#Mar. 22, 2010
import sys
 
#Open file
FILE = open(sys.argv[1],"r")
 
#Read input file
indata = FILE.readlines()
 
#Strip header
del indata[0]
size = indata[0]
del indata[0:2]
 
#Open output image
GREY = open("out_grey.ppm","w")
 
#Write header to output image
GREY.write("P3\n")
GREY.write(size)
GREY.write("255\n")
 
#Calculate and write RGB values
counter = 0
for x in indata:
  val = x
  if counter % 3 == 0:
    val1 = int(val)*.3
  elif counter % 3 == 1:
    val2 = int(val)*.59
  elif counter % 3 == 2:
    val3 = int(val)*.11
  px = val1+val2+val3
  GREY.write("%d\n%d\n%d\n" % (int(px),int(px),int(px)))
  counter = counter + 1
 
#Close files
FILE.close()
GREY.close()

Hi all,

So this week, I’ve been in a crunch to get some last minute cash for spring break. My Dad had a little opportunity for me to write a Python script for him to use at the office. The back story is basically that the warehouse where he works has to take inventory using some sort of hand-held scanning devices.

He wanted me to write a script that, when placed in a directory with any given number of output files from the devices, generates a document stating each file and how many cartons are in each pallet. Sounds like a perfect job for Python, right? Exactly right. It literally took me about 45 minutes to 1 hour and I had the thing completely off the ground running. I’ve decided to post it not so much because this exact program is really useful to anyone else, but because I definitely learned some cool I/O stuff while doing it.

First, I think it’s useful to get an idea of how the files looked coming in. They were basically Wordpad documents generated by Windows CE and didn’t have much format to them. Here’s a little example:

m464.pwd
{\pwd2\ansi{\*\pwdcomment
************************************************************************
*
* This is a Microsoft WordPad document.
*
* For further details visit the Microsoft Windows CE web site, at
*         http://www.microsoft.com/windowsce
* Or search MSDN for 'Microsoft WordPad'
*
************************************************************************
}\ansicpg1252\deff0\deflang1033{\fonttbl{\f0\fnil\fcharset0 Tahoma;}}
{\colortbl ;}
\viewkind4\uc1\pard\cf0\f0\fs22 008022376\par
008022375\par
008022379\par
008022380\par
008022381\par
\par
}
^@

As you can see, It’s a little hard to decipher. Also, keep in mind that this is not a full file as I didn’t want to post 600 lines in there. Anywhere there is a ‘\par’, except for the lone one at the end, there is a carton in the warehouse. All I had to do was figure out a way to add.

My program gave the following output:

Inventory Count
Generated: 03/09/2010 21:45:37
------------------------------------------------
Filename           # of Cartons
------------------------------------------------
m468                602
m466                286
m461                144
m465                245
m464                199

So, as you can see, it seems to work pretty well. I can also imagine this is WAY easier than counting by hand. So, here is the code that converts one to the other. Be sure to notice the usefulness of the calls like getcwd(), which proved to be awesome for finding all the files in the directory.

#Spencer Smith
#Inventory Calculator
#Created 3/9/2010
 
import sys, os
from time import strftime
 
#Name of output file
filename2 = "inventory_count.txt"
 
#Get all files in current directory
total_files = os.listdir(os.getcwd())
pwd_files = list()
 
#Find all files with '.pwd' extension
for x in total_files:
   if x.find(".pwd") != -1:
     pwd_files.append(x)
 
#Return error to 'error.log' if there are no '.pwd' files in the directory
if len(pwd_files) == 0:
  FILE = open("error.log","w")
  FILE.write(strftime("%m/%d/%Y %H:%M:%S") + " -- No files '.pwd' files in directory to read.")
  FILE.close()
  sys.exit(-1)
 
#Open output file for writing
OUT = open(filename2,"w")
 
#Create header
OUT.write("Inventory Count\n")
OUT.write("Generated: "+strftime("%m/%d/%Y %H:%M:%S")+"\n")
OUT.write("------------------------------------------------\n")
OUT.write("Filename           # of Cartons\n")
OUT.write("------------------------------------------------\n")
 
#Iterate through available '.pwd' files
for name in pwd_files:
 
#Open file for reading
   FILE = open(name,"r")
   counter = 0
   suffix = "\par"
 
#Search each line for "\par". "\par" on the line means that there is a carton on this line.
#Increment carton counter if found
   for line in FILE:
      if line.find(suffix) != -1:
        counter = counter + 1
#After reading all lines in file, write filename and count to output file.
   OUT.write("%s                %d\n" % (name[0:-4],counter-1))
#Close current file and reset.
   FILE.close()
 
#Close output file so that it can be read.
OUT.close()

Enjoy! Hope someone finds it useful!

I am in a Distributed Computing class this semester. We just had to write a brute-force password cracker using the Condor grid we have on-campus. It really took forever to generate an 8 character (a-z) code even though I ran it 676 different times. Total run-time was about 25 minutes. Anyways, we also had to create a password cracker using a dictionary file. I thought this was an awesome project and it was so much faster! I’ve decided to post the dictionary Python script. It should crack any word, given that it is in whatever dictionary you choose to use it against. My word for the project was “schnecke”, which is German for “snail”. Knowing that, I checked it against the Ubuntu New German dictionary. The run-time was ~.3 secs.

Check it out!

P.S. In order to get language dictionaries to check against in Ubuntu, it is as easy as “apt-get install ngerman” or whatever language package you need. I found a list of these packages with a quick Google search. If you’re doing more evil than good, you can also easily find a list of “common passwords” in text form.

#Spencer Smith
#dict_crack.py
#Usage: python dict_crack.py <md5 encrypted password> <dictionary path>
#Example: python dict_crack.py ...
#... 75d3d991f75c3bcbecbbcaa712baa678 /usr/shared/dict/ngerman
 
import time
import hashlib
import sys
 
#start runtime clock
start = time.time()
 
#set md5 encrypted password from command line we are looking for
solution = str(sys.argv[1])
guess=" "
sol = "no solution found"
 
#open dictionary file
filename = open(str(sys.argv[2]),'r')
 
#for each entry, generate md5 encryption and check ...
# ... against desired solution
 
for line in filename:
  m = hashlib.md5()
  #cut off '\n' character
  m.update(line[:-1])
  guess = m.hexdigest()
  if guess == solution:
    sol = line
    break
 
#close dictionary file
filename.close()
#stop time
end = time.time()
#calculate rough estimate of run-time
t_time = end - start
print "total runtime was -- ",t_time," seconds and the answer was:",sol